RUSH LOGO Rush Render Queue - Irush Interface
V 103.07b 05/11/16
(C) Copyright 2008, 2016 Seriss Corporation. All rights reserved.
(C) Copyright 1995,2000 Greg Ercolano. All rights reserved.

Strikeout text indicates features not yet implemented

Irush Overview, Section 2

INDEX

   Adding Frames  

This screen shows an updated frames report and the input box for adding frames:

To add frames, do the following:

The results:

   Removing Frames  

There are two different methods whereby you may remove frames:

    A. Multiple-Select a group of frames, and hit the "Remove Frame" button.

OR:

    B. Enter the Frame Range and hit the "Rm" button next to the input box.

The results:

   Using Job Edit  

You can edit most of a job's attributes on the fly while the job is running.

With the job first selected as the 'current job', hit the "Job Edit" button under the Job Control heading:

This will open the Job Edit window.

Note: In version 102.42 and up, the Job Edit window features a 'tabs' oriented window
though the functions are still the same.

In this screen, you can change the data, and hit 'OK' to make the changes take effect.

What follows are walk-throughs for some specific situations:

   Job Edit: Adding Cpus  

You can add cpus to an existing job at any time through the Job Edit window by entering new cpu entries in the 'Add' field, one per line:

Hit the "OK" button in the lower right-hand corner to make the changes take effect.

The Jobedit screen will then close, and you will be returned to the main irush screen. Note: If you see this error dialog when hitting 'Done', enable the 'FU' button in the irush screen, then hit 'Done' again.

Hit the "Cpus" buttons under Reports, to view the updated Cpus report.

   Removing Cpus  

You can remove cpus from an existing job at any time either from the 'Cpus' report (using the 'Remove Cpus' button), or through the Job Edit window.

If the cpus happen to be busy rendering when you remove them, the renders will be killed, and the frames requeued to other processors.

Cpus Report: Removing Cpus

To remove cpus from the 'Cpus' report, click 'Cpus', highlight the cpus you want to remove from your job, then hit 'Remove Cpus'. This will remove cpus only from the 'current job', not any other jobs.

Job Edit: Removing Cpus

To remove cpus, go into the Job Edit screen, multiple-select the cpus to be removed and hit the "OK" button in the lower right-hand corner:

When you refresh the 'Cpus' report, you will see the cpus have been removed.

   Sorting  

Click on an empty bar at the top of a particular column you wish to sort.

With subsequent clicks you can toggle between ascending & descending order. The buttons are 'three-state': 'Sort Up', 'Sort Down' and 'Sort Off'.

The field you have selected will be 'remembered', even between executions of irush. (This info is saved in your ~/.irushrc file).

To disable sorting, keep clicking the sort button until it turns off.

   Changing Priority  

You can change the priority for the cpus in an existing job at any time (even while the job is rendering) through the Cpus report screen.

The quick procedure is:

    1) Hit 'Cpus'
    2) Highlight the cpus (^A to select all)
    3) Enter a new priority at the 'Priority' prompt (to the left, just below the 'Cpu Controls' heading)
    4) Hit the 'Priority' button
..which will change the priority of the cpus you selected.

The following example shows all CPUs having a priority of 50, and we only want to change the renders on 'meade' and 'superior':

Hit 'Cpus'

To change the priority of any given group of Cpus, multiple-select the group, enter the new value under Cpu Controls, and hit the "Priority" button:

Highlight Cpus / Enter Priority / Hit 'Priority'

The result:

   Change #Cpus  

You can change the cpu caps for the cpus of an existing job at any time through the Cpus report screen.

First display the list of Cpus, to see what the current values are set to. Hit the "Cpus" button under Reports.

Here, we see the +any group is capped at 5; no more than 5 cpus will be used for rendering at any given time for this +any group.

Here, we want to change the number of cpus from 5 to 10.

Select the first CPU entry in that group (it is only necessary to select one), and enter a new value of 10 in the "Change #Cpus" box, then hit the "Change #Cpus" button to apply the change.

The result:

   Defining Hotkeys  

You can set up the function keys on your keyboard to invoke your own custom commands from within irush. For instance, to invoke a submit script with a single keypress, or easily view an animation sequence.

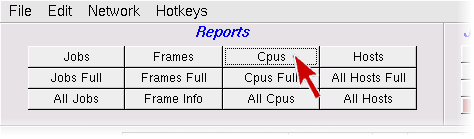
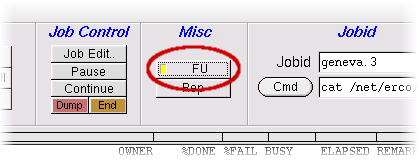
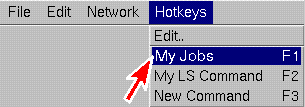
1) Open the Hotkeys editor from the irush main menu:

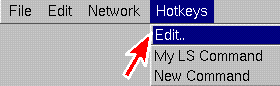
This will bring up the following screen:

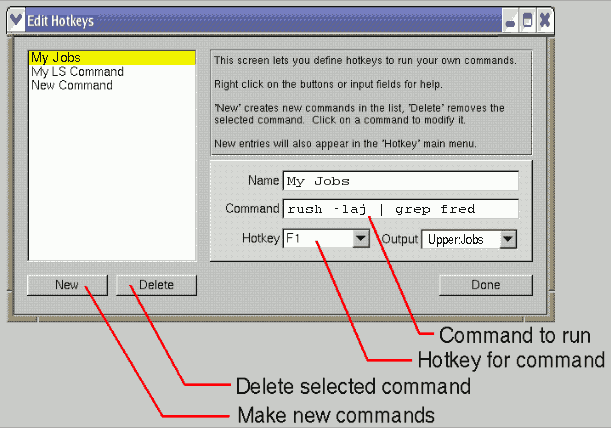
2) Hit 'New' to define a new command.
3) Enter the command to run in the 'Command' field
4) In the "Hotkey" field, choose a function key to assign the command
5) Enter a 'Name' for this command [optional]
6) Choose which "Output" window the command will be sent to. 7) Hit 'Done'. That's it!

Now, when you're in irush, just hit that function key to invoke your command.

You can set up several commands, one for each function key. Irush will remember them, even when you exit. The commands you define will also appear in the irush 'Hotkeys' menu, so you can invoke them from there too, without using the function key:

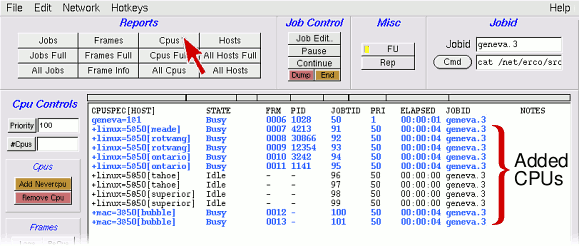
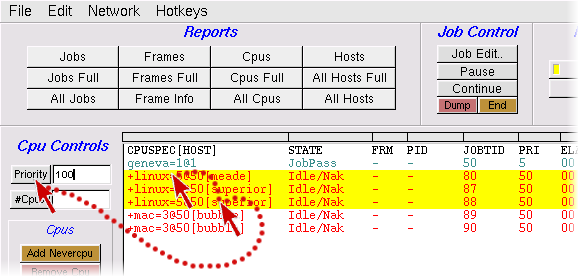
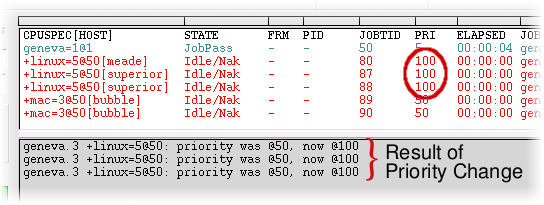
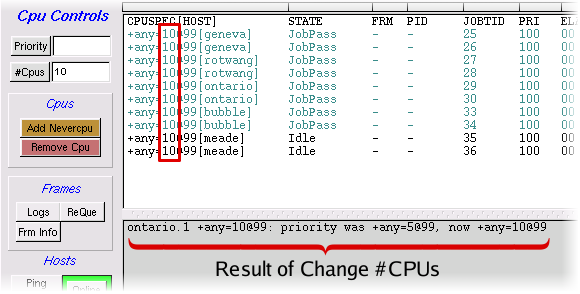
By default, your command's output will be sent to the 'Lower' gray irush terminal screen (Output: Lower), but you can change it to use eg. 
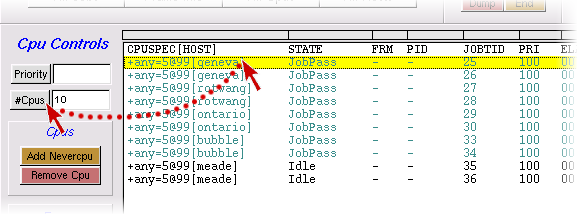
'Upper:Jobs' (shown above) which will use the upper "white" irush screen, showing the "Job Controls" at the left, allowing the user to highlight your report, and do 'Job' operations on it.

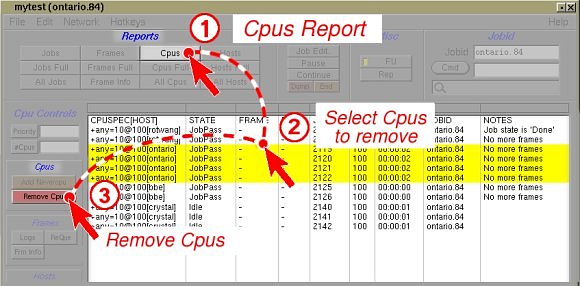
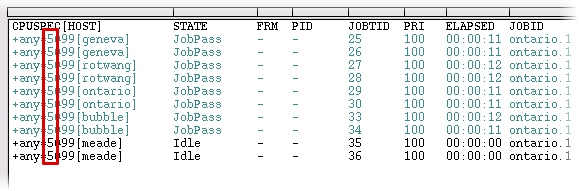
Be sure your report format matches the controls you select for the "Output:" field; if you choose "Upper:Jobs", your report must have the same columnar format as the regular "Jobs" report.

   Creating Shortcuts to irush  

Creating shortcuts to irush is easy on all the platforms; Windows, Mac/OSX, Linux, Irix.

Windows

  1. Right click on the desktop, choose New | Shortcut.
  2. Change settings as shown above.
  3. Hit OK.
  4. To run irush, double click on the icon.

Mac / OSX

  1. In the finder, click on Go | Go to Folder.
  2. Enter /usr/local/rush/Applications.
  3. Highlight the "irush" icon
  4. Hold down Alt-Apple keys while dragging the icon to your Desktop.
  5. To run irush, double click on the new icon.

Linux

  1. Right click on the KDE desktop, choose Create New | Link to Application.
  2. Enter the path /usr/local/rush/bin/irush.
  3. Hit OK.
  4. To run irush, double click on the new icon.

Your mileage may vary, due to the variety of window managers available.
Example shows RedHat 7.2 / KDE.

Irix

  1. In the toolbox, click on Desktop | Home Directory.
  2. Navigate to the /usr/local/rush/bin directory.
  3. Drag and drop the irush to your desktop.
  4. To run irush, double click on the new icon.

   Irush On The Command Line  

You can bring up Irush by just typing 'irush' on the command line, and then navigate to a job by hitting 'Jobs' or 'All Jobs', then double-clicking on one of the jobs to make it the 'current job'. Then hit 'Frames' to view the frames report for the job, etc.

You can optionally supply a jobid on the command line, so irush will use that as the 'current job', e.g.:

    irush tahoe.15

You can tell irush to automatically show the "Frames" report for that job as soon as irush opens, using the '-button Frames' option:

    irush tahoe.15 -button Frames

By default, irush shows the jobid and job title in 'title bar'. You can override the default by using the '-title' option.. in this case, we force it to show "My Job" in the title bar:

    irush tahoe.15 -button Frames -title "My Job"

See 'irush -help' for more info.

Commands such as these will work in both Unix and DOS shells, or invoked from within scripts.

   You Are Not The Owner?  

When using irush to edit another person's job, you may encounter this error dialog:

This error dialog indicates you are not the owner of the job.

To override this error (if your sysadmin has enabled your permission to do so), enable the Force User ("FU") button in the irush window, then hit 'Done' in the Job Edit window to complete your changes.

Next Page